On this page, we will guide you through the process of creating your Guest Login credentials to access. A guest login means you will use your personal email address to access Comtex Web Services.
If you already have a Comtex, JLM or PON Projects email address, then you do not need to create Guest credentials.
Summary of Steps
Step 1
Accept Invitation and Sign-in to or Create your Microsoft Account
Step 2
Install or Activate Microsoft Authenticator
Step 3
Access Comtex Portal or Sharepoint
Step-By-Step Instructions
Note: It is easier to follow these steps from a laptop or computer.
Step 1 – Invitation Email
You will receive an email from “Microsoft Invitations on behalf of Comtex” which will contain a link for you to Accept Invitation.
Click this link, and you will be directed to a Microsoft login prompt.

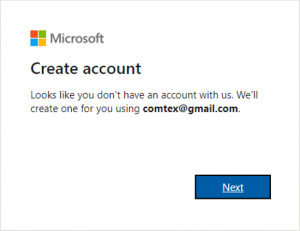
Step 2 – Create your Microsoft Account
If your email address has not previously been used to create a Microsoft account, you’ll need to create one.
Select Next
(If you have already registered your email address with Microsoft, then you just need to sign in and go to Step 5)
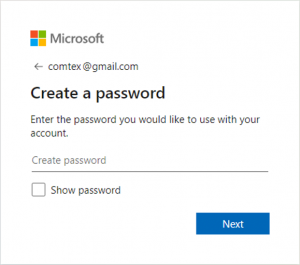
Step 3 – Create a Password
Then create a password for your account.
Try to make it a secure password that is difficult for someone else to guess.
Select Next
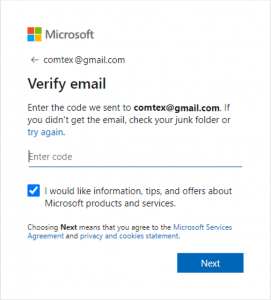
Step 4 – Verify Email
You’ll need to verify your email address.
A verification code will be sent to your email address. Open the verification email and copy the security code here
Select Next
You may be asked to verify you are not a robot. Follow the prompts until you get to the next step.
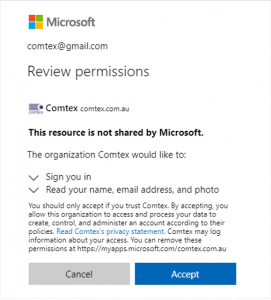
Step 5 – Grant Permission
To allow your login to work with the Comtex Online Applications, you need to click Accept. This only allows the Comtex Intranet and Portal to read your name and email address so that we can link your login to your staff profile.
It does not allow the company to access any of your personal information linked to your personal account.
Click Accept
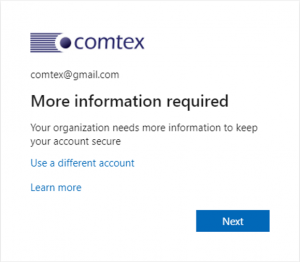
Step 6 – More information required
To keep our data safe, we require the use of 2 Factor authentication.
This means from time to time when you log in to Comtex Applications, you’ll be asked to provide a second code, or to approve the login using the Microsoft Authenticator App.
Click Next
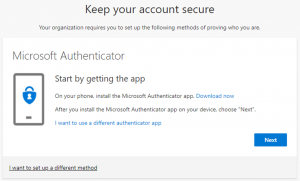
Step 7 – Setting Up 2 Factor Authentication
There’s a number of different ways you can setup 2FA. This guide will show you how to setup 2FA using the Microsoft Authenticator App.
If you want to use a different Authenticator app (Like Google Authenticator) you can. Just click the link.
If you don’t want to use an app, click I want to set up a different method and you can choose to receive a text message instead.

Confirm you will use the Microsoft Authenticator App.
Click Next
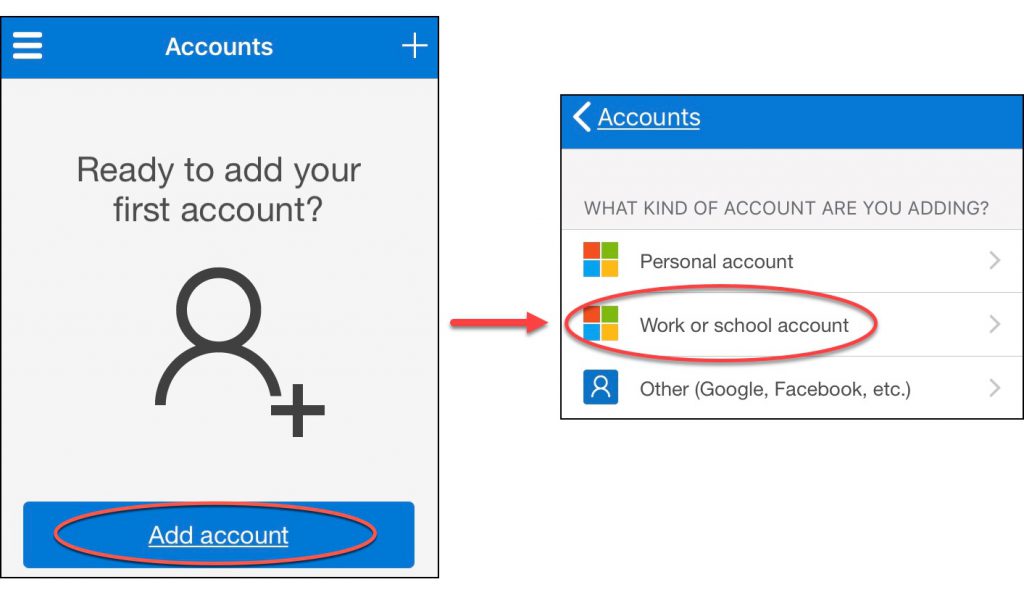
Step 8 – Download the Microsoft Authenticator App
In the Apple Store or Google Play store, search for Microsoft Authenticator and install the application.
Launce the app, and click the Plus + in the top right corner to add a new account.
Select Work or school account
Select Scan QR Code or if you are doing this process on your phone, click Sign in
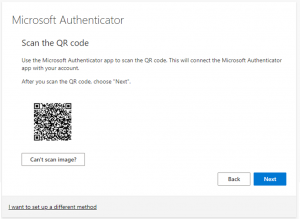
Step 9 – Add Account to Authenticator App
Scan the QR Code with the Authenticator app.
Or if you cant scan the QR Code, sign in with your credentials click Cant Scan Image.
If you continue to experience troubles activating the Authenticator, click I want to set up a different method and choose txt message.
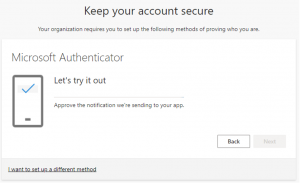
Step 10 – Check the Authenticator App
You’ll then be asked to test the authenticator app is working.
Follow the prompts to Approve the request. An alert should appear on your phone to approve a request.
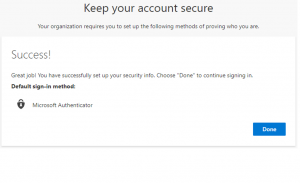
Step 11 – Success
Congratulations, you have successfully created your credentials and can now log into Comtex Portal
Next Steps
You can now Log into the Comtex Portal.